Getting to the Point: Choosing & Using Needles
Despite what someone outside of the embroidery business might think, many shops do not consider the importance of selecting and using the right needle. It is the one tiny little item that seamlessly takes on all the weight, pressure, and speed of the stitch. So although the most expensive things in your embroidery shop might be the industrial machines and the high end fabric steamers, the one thing that might save you the most time and headache is the right needle for the job. This article goes over the basic needle know-how.
Needle Types
There are several different types of needles, but not all are created equally. If you try to offer your customers foam puff, leather designs, or tiny lettering while using the same type of needle, you’re going to struggle. Here is a breakdown of what each one is and how they can be used:
-
Ball Point: Use for fabrics that stretch, such as polo’s, t-shirts, and knit fabrics.
-
Sharp Point: Use for thicker materials such as ball caps, towels, denim, jackets, and foam designs.
-
Wedge Point: Perfect for leather!
-
Titanium (Sharp): This can also be used for anything thick, such as foam and ball caps.
Great tip: Titanium needles typically have a gold coating on them, so you might consider using these for thicker materials so you and your staff can easily identify them without taking them out of the machine.
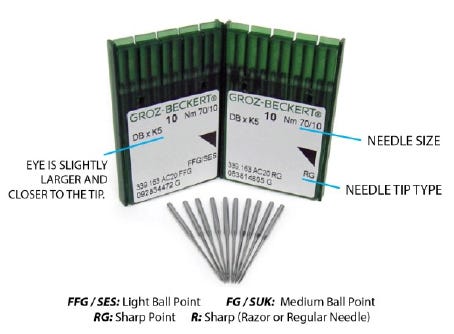
Understanding the Label
When getting ready to re-order needles, you might look to the label to help you remember exactly what you need to tell your rep. Unfortunately, the labels on needle packaging is small, so the industry has “codes” to delineate the needle shape, size and material. Reference this handy graphic to help you order your new needles:
Needle Sizes
Just as it is with the type of needle you’re using, the size can also determine whether or not you have continuous thread breaks, as well as the quality of the stitch. You will typically see two numbers, the smaller one being the American standard, and the larger one being the European size.
Although an 70/10 or 75/11 are the standard needles that many shops use, there are ways you can achieve better results with a different size. For example, a larger needle, such as a 90/14, would be better for metallic thread. Consider having 3-4 standard sizes in your shop so that you have some options to play with when your clients offer you a challenging design.
Changing Needles
Although there is no set schedule that works for everyone, there are a few ways to determine how often you should change out your needles. If you’re a larger shop and production is high, you might simply opt to change all them weekly at a set time to ensure you have a fresh set ready to go. Dull needles can lead to thread breaks and do-overs, so when you notice these things happening ever so often, consider testing different schedules that work within your time and budget. Training your employees and creating a system for labeling, changing, and ordering needles will require some legwork in the beginning, but will allow you to easily shift gears and delegate later.
Many issues in embroidery can stem back to needing a new or different needle. These tips can help you better troubleshoot and avoid costly mistakes.
New to embroidery and want more tips and ideas?
Sign up for the next Introduction to Embroidery Class by GSG U!